
Fall process art is a fantastic way to begin the preschool year. Students are still mastering basic art supplies, like glue sticks and scissors. Process art is a great way to give students a lot of chances to practice with a high success rate.
Easy to set up, beautiful when finished, these fall process art ideas are ones that any teacher is sure to “fall” in love with.
Fall Process Art Idea #1 – Picasso Style Shape Art
This art project is so simple, but the results are gorgeous!

Supplies Needed:
- construction paper circles of various sizes, cut in fall colors
- brown strips of construction paper
- glue sticks
- full sheets of construction paper
First, remind students of how to use a glue stick. The students dab some glue on each circle or brown strip and put it on the paper. They can glue them however they like.
When the students finish, trim any pieces that hang over the edges of the paper. Some students will choose to make self-portraits. Others might go a different route and make vehicles. But no matter how the students put their art together, it is uniquely theirs, and they can enjoy the process of creating art on their own terms.
See more photos and get the complete directions HERE.
Fall Process Art Idea #2: Leaf Collage
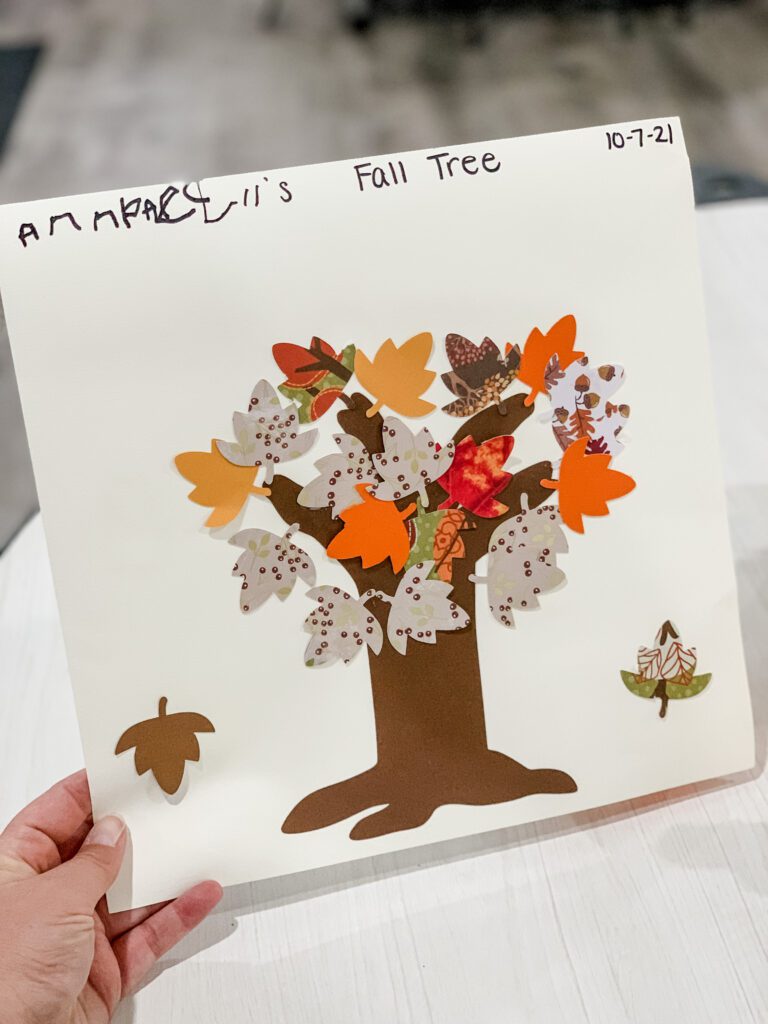
Supplies Needed:
- light colored construction paper
- brown crayons or markers
- leaf shaped confetti or small scraps of paper
- glue or glue sticks
To create this beautiful fall art, trace each student’s arm and hand on a large piece of paper. The students then color them brown to represent a tree trunk and branches.
When the trunk is ready, they glue on leaf cutouts or fall-colored confetti. Many leaf-shaped hole punches are available at most craft stores or online. If one is not available, small scraps of orange, brown, yellow, and red paper work too. For another variation, check out this one that uses magazine scraps!
Here’s a whole unit to “Fall” in love with!
Fall Preschool Unit
$12.00This Fall Preschool Unit includes 10 days of complete lesson plans with everything done for you. Just print and teach these developmentally appropriate (ages 3-5) fall-themed activities.
Fall Process Art Idea #3: Drip Painting
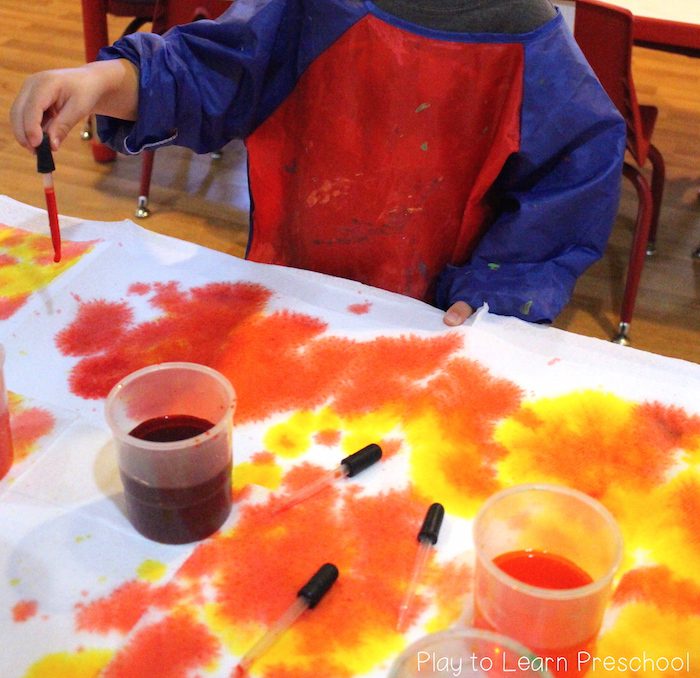
Supplies Needed:
- paper towels
- eye droppers or pipettes
- food coloring or liquid watercolor in fall colors
- sturdy cups of water
- shower curtain (optional, but recommended)
- construction paper or cardstock
First, cover the art table with a shower curtain for easy clean-up and protect the table from becoming stained. Inexpensive plastic tablecloths work as well – whatever is easiest to come by.
Next, layer absorbent paper towels all over the table. Provide cups of liquid watercolors and little eye droppers. It is a good idea to demonstrate how the eye droppers work. Move the chairs out of the way so that students can cover the whole surface in brilliant colors.
When the paper towels dry, separate them into sheets. Next, mount them on cardstock or construction paper for a gorgeous fall abstract art, or cut the paper towels into shapes to use on a handprint tree trunk for a forest of fall colors!
Read more about this project here!
Fall Process Art Idea #4: Painted Pumpkins
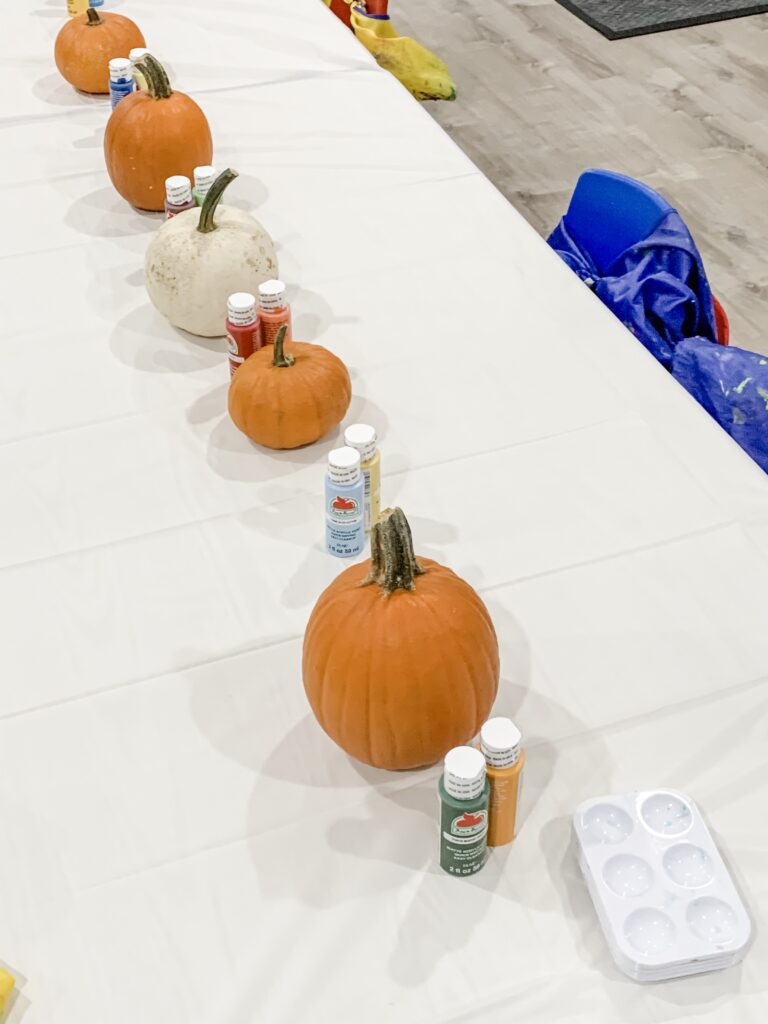
Supplies Needed:
- mini-sized pumpkins
- acrylic paints
- brushes
- paint palettes (or paper plates)
This idea is a classic, but students always adore it. Before class, be sure to wash the pumpkins to remove any grit and residue. Acrylic paints are needed as tempera flakes off. Encourage students to decorate them however they wish for a lovely fall process art display. Add google eyes and other fun collage elements if it is close to Halloween for some extra holiday fun!
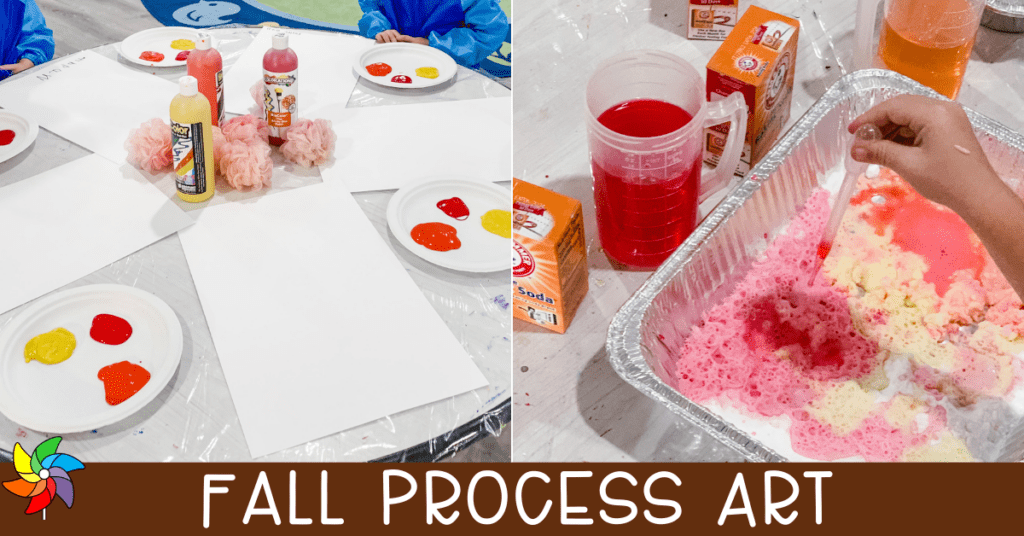
Fall Process Art Idea #5: Fizzy Art
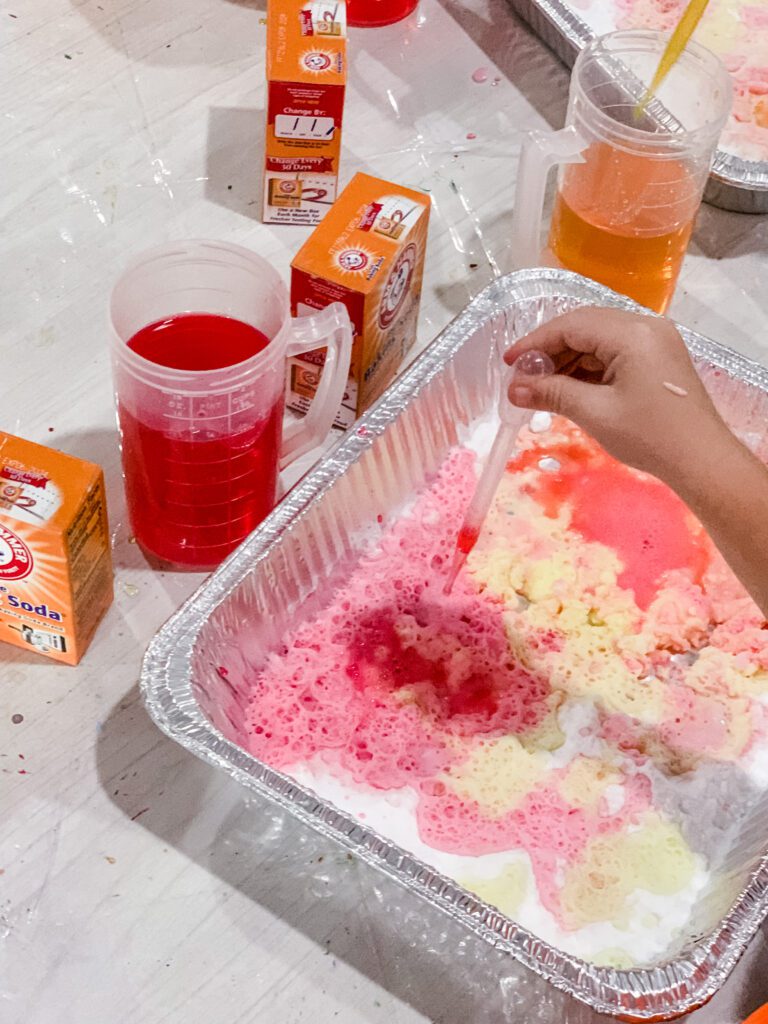
Supplies Needed:
- Baking Soda, about 1 box per child
- aluminum baking pans
- white vinegar
- food coloring or liquid watercolor
- eyedroppers or pipettes
This simple art idea is all about the process. Give the fine motor muscles a real workout with this fun project. Students drip colored vinegar into pans of baking soda and watch it fizz and bubble! While it’s not an art project that goes home, it is definitely one that keeps students engaged. Read more about it here!

FREE Fall Bundle!
Enjoy Free Fall resources perfect for the season!
After you subscribe, you will be redirected to the FREE Fall Bundle. We respect your privacy. Unsubscribe at any time.
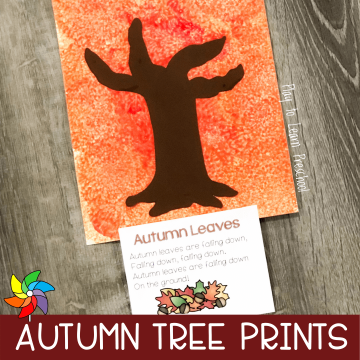
Fall Process Art Idea #6: Easy Autumn Tree Prints
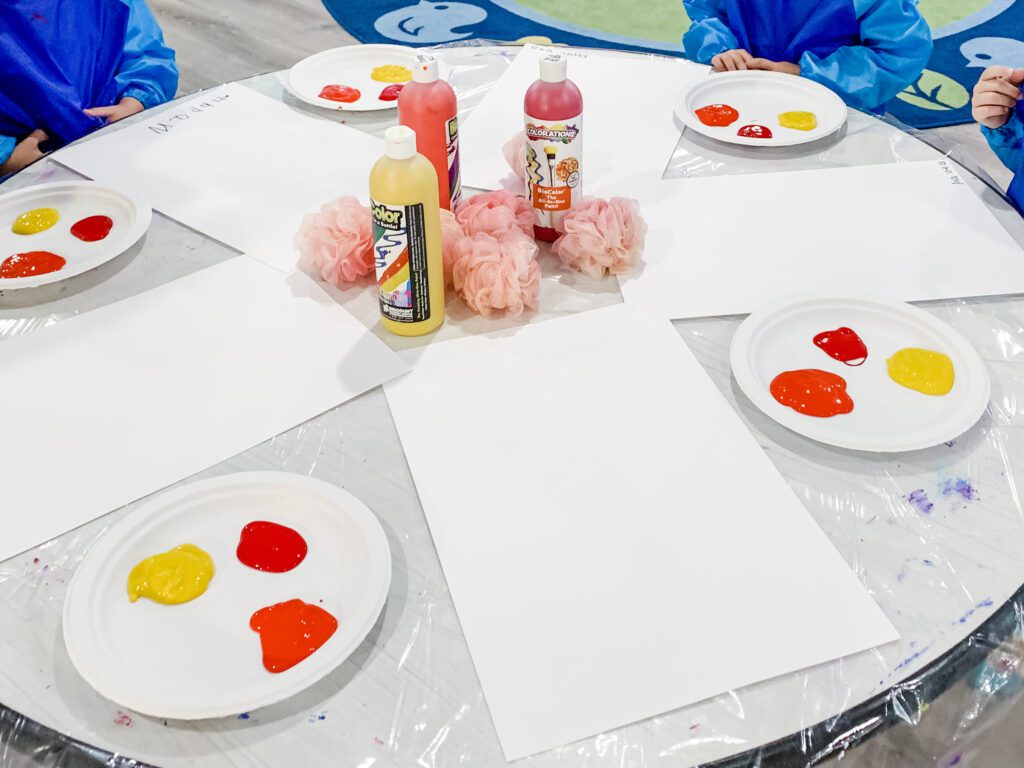
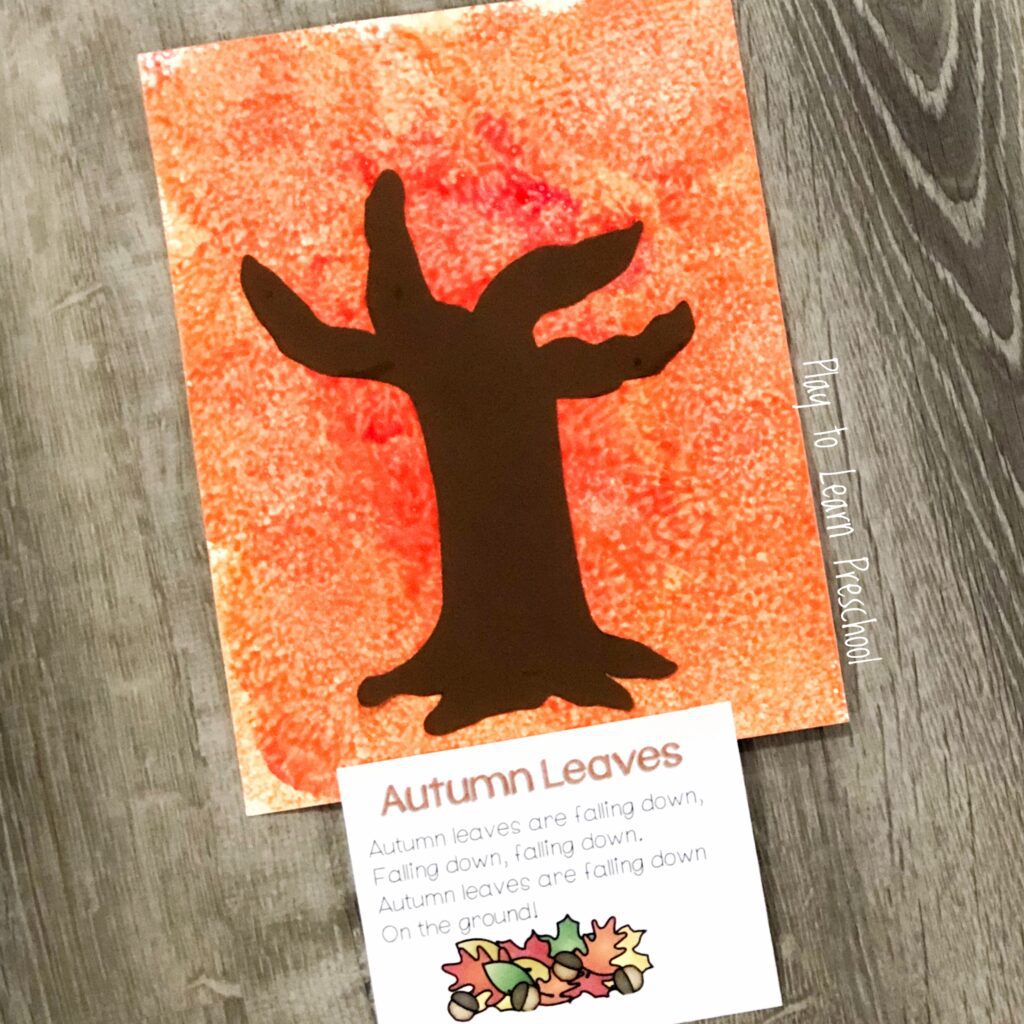
Supplies Needed:
- art canvases or white cardstock – one per student
- tempera or acrylic paint in red, yellow, and orange
- bath poufs
- brown construction paper
First, students dip the bath poufs in the paint. Next, they press it on the canvas and repeat until they feel they are finished. After the canvas dries, glue a tree trunk shape cut out of brown construction paper to make a tree from the fall process art project. Definitely a keepsake!
For more pictures and in-depth instructions, click here!
Fall Process Art Idea #7: Fall Confetti Scissor Practice
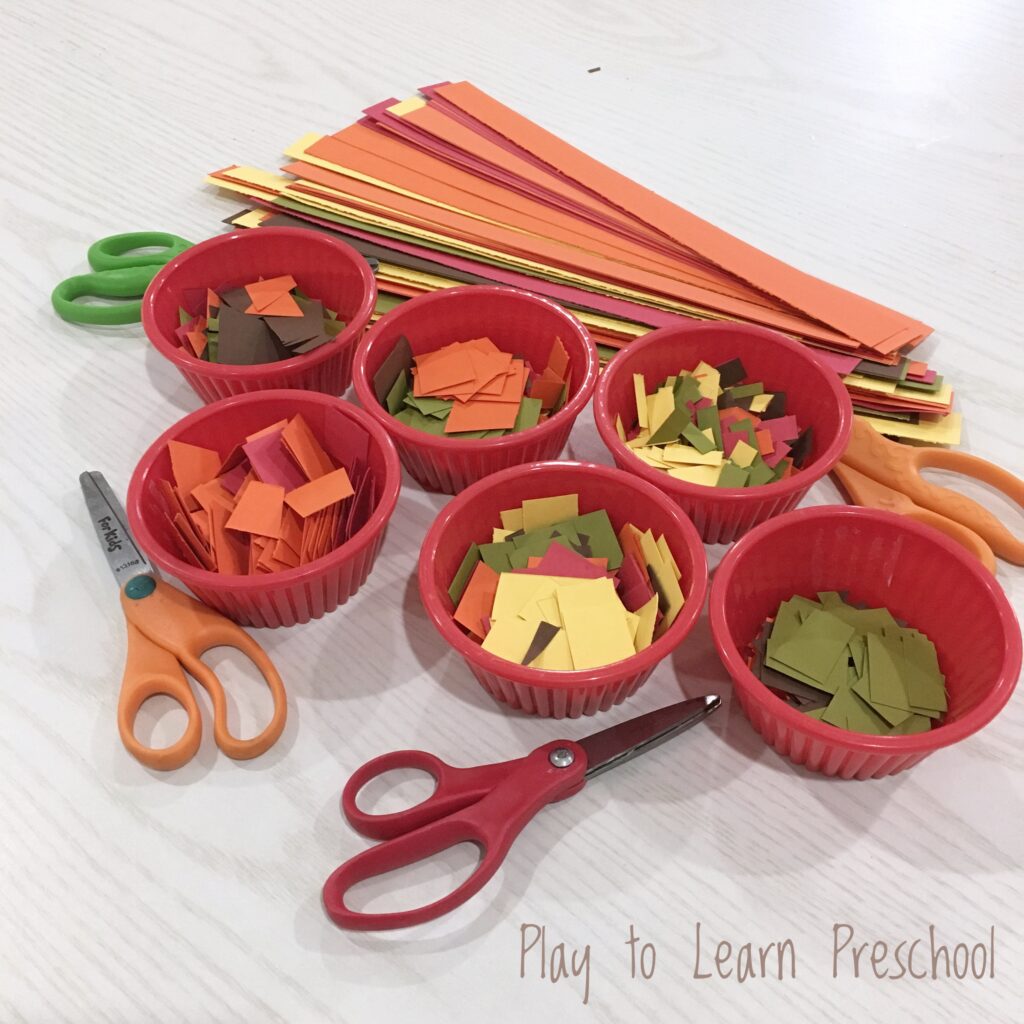
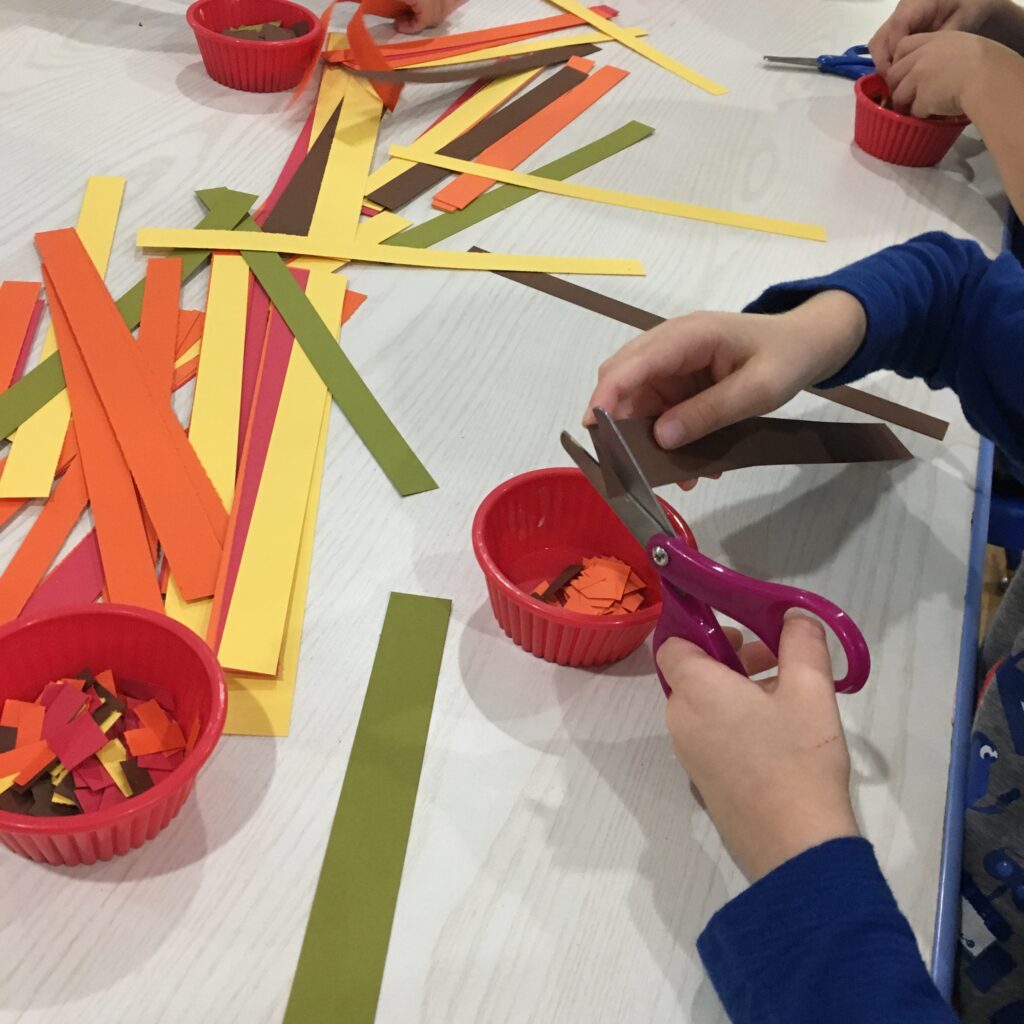
Supplies Needed:
- Construction paper in assorted fall colors
- child safety scissors
- small containers
It may seem too simple to be true, but preschoolers enjoy the simple act of cutting paper into small bits. This is fantastic fine motor practice! Scissor skills are fundamental, and practicing on simple “low risk” projects like this helps develop confidence and strength without frustration.
First, set up an invitation to play by providing inch-wide strips of orange, brown, yellow, and red construction paper, scissors, and small cups or baskets at the art table. Demonstrate proper scissor grip to the students, and watch them get to work!
As a bonus, the confetti they create can be further utilized in other art projects, for sorting activities, and for spontaneous celebrations! Because this is such an important skill to practice, revisit this project year-round by simply changing the paper colors. Read about it more here!
Fall Process Art Idea #8: Collage Art
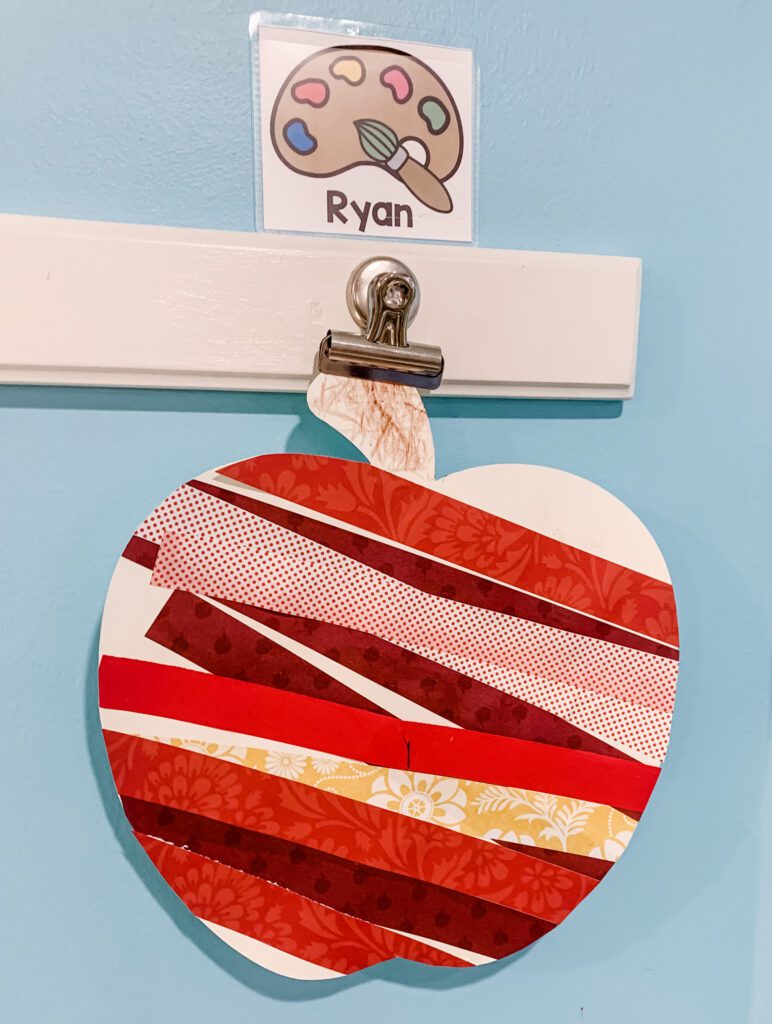
Supplies Needed:
- Cardstock
- Assorted scrapbook paper
- Glue sticks
Cut the scrapbook paper into strips roughly one inch wide. Students practice their glue stick skills and apply the strips to a piece of cardstock. When they are finished, cut the cardstock into the shape desired. For the apple art pictured, students were given an assortment of red, yellow, and light green strips of paper. This project works for any theme, just change up the paper colors and the shape!
Fall Process Art Idea #9: Apple Prints
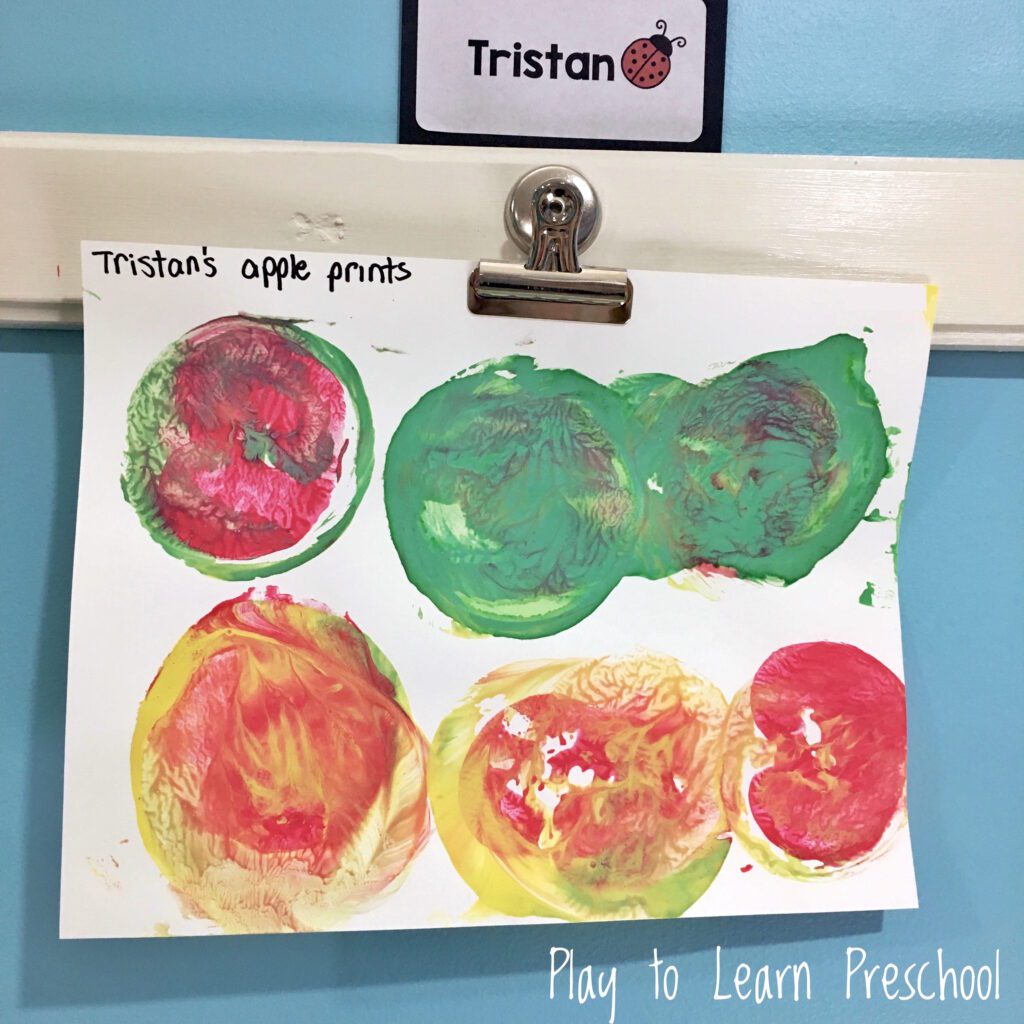
Supplies Needed:
- apples
- tempera paint in red, yellow and green
- heavy construction paper
This classic never goes out of style! First, cut the apples into half both from top to bottom and across horizontally. Pour paint onto paper plates or shallow trays. Students dip an apple half in the paint and then press it firmly on the paper to make a print.
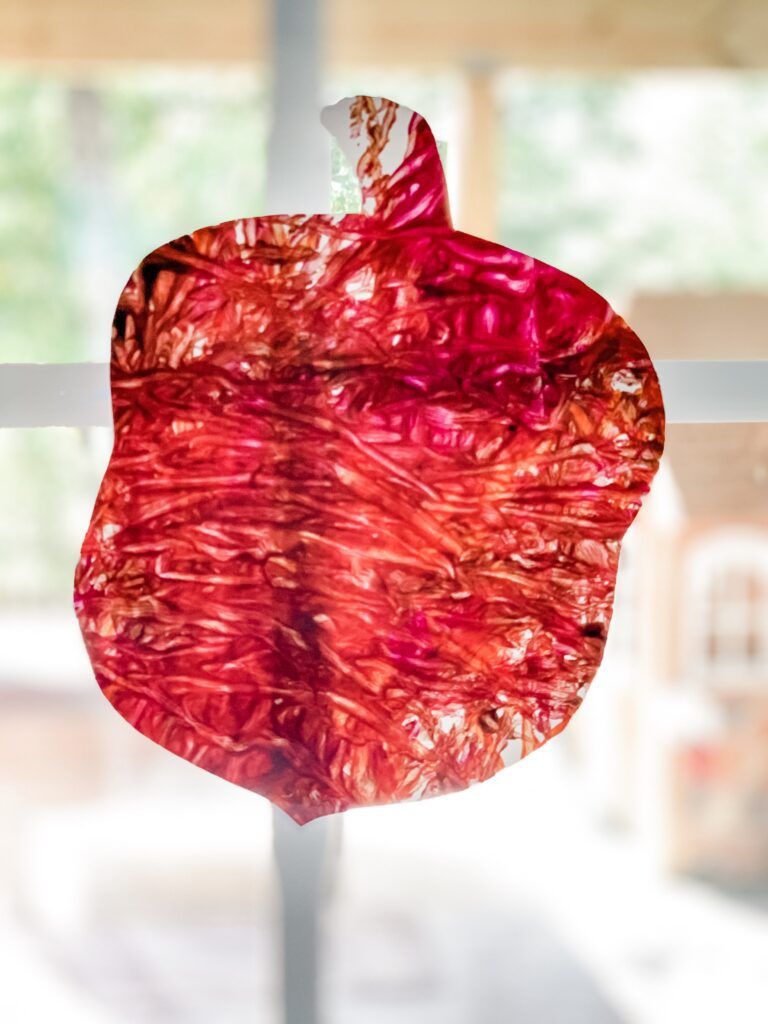
Fall Process Art Idea #10: Acorn Art
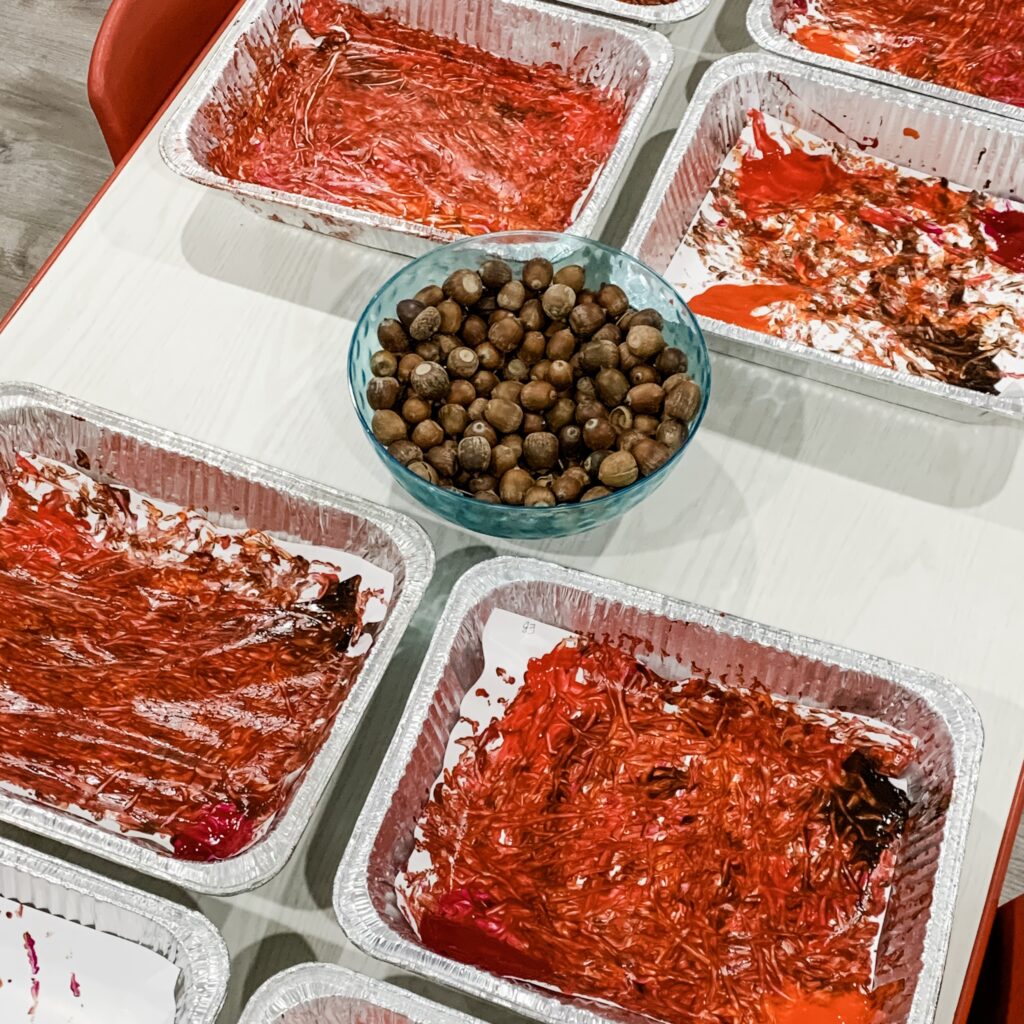
Supplies Needed:
- Foil tins (approximate size 9″x13″) or other trays
- Paper (9″x13″ or smaller)
- Paint in fall colors
- A bowl of acorns
Place a piece of paper in the bottom of the foil pan. Drip in a few small puddles of different colors of paint. Have the children pick acorns from the bowl to roll around inside the tin. The students pick up the tin and gently roll the acorns back and forth until the paint covers the paper. Let the children experiment with the acorns and paint while the paper fills with the beautiful fall colors.
When the paper is dry, cut it into the shape of an acorn and hang it in a sunny window for a suncatcher effect.
See more photos and get the complete directions for Acorn Art HERE.
More Fabulous Fall Process Art Ideas
- Negative Space Fall Hand Print Art – Fun-A-Day
- DIY Fall Art Stamps for Kids – Fantastic Fun & Learning
- Leaf Stained Glass Art – PreKinders
- Fall Leaves Art Activity – Pre-K Pages
- How to Make Puffy Paint Pumpkins for a Fall Art Activity – Preschool Inspirations
- Glittered Leaf Ornaments with 2-Ingredient Clay Dough – Happy Hooligans

Have you ever done any shaving cream marbling?
No! Tell me more. 🙂